Texture Atlas Generator is a tool that generates texture atlases for textures in selected materials and plugs them into those materials. When using the newly created texture atlases Unity can batch draw calls in order to improve performance.
The tool generates atlases with textures that are present in materials selected in Unity’s editor. Material’s properties like texture’s tiling and offset are used to properly sample new textures in shaders.
For proper atlasing, meshes’ texture coordinates need to be in [0, 1] interval. Some meshes don’t satisfy this condition. That’s why Texture Atlas Generator comes with UV wrapper. A model postprocessor that will automatically wrap uvs to the required interval. Meshes whose uvs are to be wrapped need to have phrase “uvwrap” in their names. You can change this behaviour by modifying MeshUVWrapPostProcessor class.
Screenshots
Interface
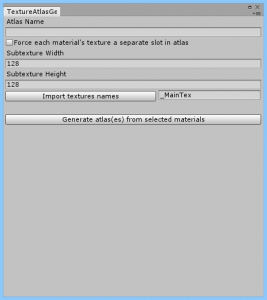
- Atlas Name – name of the atlas to generate.
- Force each material’s texture a separate slot in atlas - when this option is off, materials that use the same texture will have only one (this one) texture in the atlas, thus saving memory. When this option is on, when the same texture is used by say two different materials, then this one textures will appear twice in an atlas. So why use it? In cases when there are single tiling/offset params for many textures in a single material. Unfortunately for atlasing, Unity’s built-in standard PBR shaders use one tiling/offset pair for a group of textures. In that case you would have to tick this option on. In case when each texture in each material has its own tiling/offset pair then you can safely leave this parameter off.
- Subtexture Width/Height - size of each of the textures in the atlas.
- Import textures names - this button will import all textures names that are present in all currently selected materials and will display them in the edit box to the right. By default it is filled with “_MainTex”. If default option was left this would mean that only textures in materials that are named “_MainTex” would be atlassed. You can specify any textures names you want here, separated by commas (white chars are skipped), and atlases for these will be generated.
- Generate atlas(es) from selected materials - generates the atlas from materials that are selected in the editor.
Examples
There are two sets of materials available at TextureAtlasGenerator/Assets/BlossomGames/TextureAtlasGenerator/Examples/Materials that can be experimented on.
Quick Tutorial
This quick tutorial will show you how to use Texture Atlas Generator step by step.
- Name the atlas in the field Atlas Name.
- Open the test scene under TextureAtlasGenerator/Assets/BlossomGames/TextureAtlasGenerator/Examples/Scenes/test.unity. Position camera so that you can see the four boxes in the middle of the scene.
- Select all materials from TextureAtlasGenerator/Assets/BlossomGames/TextureAtlasGenerator/Examples/Materials/set2 folder.
- Press Import textures names. The edit box to the right will now include “_BumpMap” as well.
- Press Generate Atlas to generate atlas textures and you will immediately see them applied to the boxes in the scene.
