Shader Generator is a simple tool that gives its users ability to generate moderately advanced shaders with just a few clicks! If you don’t feel like writing your own shader from scratch this might be something you need.
A similar tool but with less features was used to create beautiful shaders for a hack&slash game called Iesabel.
Features that are exposed by this tool include:
- Render states: z-write, z-test, cull, blend.
- Up to four texture layers (for diffuse, normal, specular, emission) that can be blended per-vertex or via texture mask.
- UV modifiers that can be applied to all texture layers. Each modifier consists of scale, offset and panning (texture scrolling).
- Value multipliers that can be applied to diffuse/normal/specular/emission layers. For diffuse layer there is also a cube-map multiplier.
- BRDF texture. Lighting can either be computed by Unity or sampled from BRDF texture. Using this option might be faster on mobile platforms. This lighting trick was used in famous Shadowgun game.
- Rim light which became a classical effect on mobile platforms by producing neatly looking outlines.
- [Unity PRO only] Refraction which can help in creating more believable glass effect.
- Integration with Unity’s lightmapping.
Screenshots
-
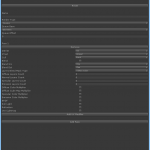
- Shader Generator interface.
-
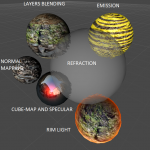
- Six spheres depicting example materials.
Interface
- Import – imports shader to the tool. Must have been generated by Shader Generator first.
- Reset – resets all parameters.
- Name – full name of the shader.
- Render Type – type of the shader. For transparency effect it is recommended to set Transparent here.
- Queue Base / Queue Offset – determine the rendering order of object that will use this shader.
- Add Pass – adds a rendering pass to the shader. One should be more than enough for vast majority of your effects.
- Remove – removes the rendering pass from the shader.
- ZWrite / ZTest / Cull / Blend / Blend Src / Blend Dst – render states. Default ones will probably be enough for most shaders. For transparency effect ZWrite should be set to Off, Blend checked, Blend Src set to Src Alpha and Blend Dst to One Minus Src Alpha.
- Layers Blend Mask Type – determines how layers will be blended. R channel corresponds to the first layer, G channel to the second, etc.
- Diffuse Layers Count – number of diffuse-map textures that will be blended to produce the final diffuse color.
- Normal Layers Count – number of normal-map textures that will be blended to produce the final per-pixel normal.
- Specular Layers Count – number of specular-map textures that will be blended to produce the final specular color. RGB channels store the specular’s color and A channel stores shininess. Black color in alpha translates to 0 shininess exponent and 255 translates to 128 shininess exponent.
- Emission Layers Count – number of emission-map textures that will be blended to produce the final emission color.
- Diffuse Color Multiplier – extra color that the final diffuse color is multiplied by.
- Diffuse Cube Map Multiplier – extra color, taken from a cube-map, that the final diffuse color is multiplied by. Cube-map will be exposed to the material’s interface.
- Specular Color Multiplier – extra color that the final specular color is multiplied by. Alpha has the same, shininess meaning, as the layers do.
- Emission Color Multiplier – extra color that the final emission color is multiplied by.
- BRDF – lighting will be taken from texture instead of arithmetic calculations. This will be faster on most low- and medium-quality mobile hardware. Since the BRDF texture is just a texture with precomputed lighting information it can store any data we want. This fact was leveraged in Shadowgun to create interestingly looking lighting on characters. Shader Generator comes with a very simple BRDF Generator that can precalculate lighting for classical Blinn-Phong lighting (with given constant shininess).
- Rim Light – enables soft silhouette lighting, very popular in games on mobile platforms.
- Refraction – this feature will enable a refraction effect which is controlled by a couple of factors. First, the alpha channel of the final diffuse color (which work as transparency). Second, a special refractiveness texture is exposed to the material which controls how refracted the surface is to be and velocity. This way effects like refracted, rippling water can be achieved.
- Use Lightmap – if an object is to be lightmapped be Unity, this feature will enable proper lighting.
- Add UV Modifier – adds a UV modifier.
- UV Modifier n – n-th UV modifier. UV modifiers’ purpose is to perform operations on texture coordinates (uv). Three operations are possible: scale, offset and panning. The former should be known for you from your Unity experience, known as tiling and offset, respectively. Each material’s texture in Unity has these parameters sort of built-in. Note that these parameters have no effect in shaders generated by Shader Generator. Shader Generator will generate special, optimized fields for material to serve this purpose. As mentioned, there is the third parameter, called panning, that can be generated. This parameter is responsible for tex-coords scrolling, which will be very useful in creating a myriad of special effects.
So far we’ve only described what a UV modifier does to a tex-coord but… which tex-coord, actually? That is set separately. A UV modifier is just an “operator” that itself will not make your diffuse nor normal map scale or scroll. You have to inform Shader Generator where you want a particular UV modifier to be applied to. - Layers UV Modifier Indices – once you have set a number (other than 0) of layers (diffuse, normal, whatever) a new field will show up in Shader Generator. For instance, if you set Diffuse Layers Count to 2 you will see a field Diffue Layers UV Modifier Indices with two fields. The first field lets you set a UV modifier for the first layer, and the second for, well, the second layer. The default value, 0, means that no UV modifier is applied and the texture will be used “as is”.
- Generate – generates a shader with given settings.
Examples
In ShaderGenerator/Assets/BlossomGames/ShaderGenerator/Examples/Levels there are sample levels built with shaders generated by Shader Generator.
Quick Tutorial
This quick tutorial will show you how to use Shader Generator to generate a simple two-layers diffuse shader, where layers are blender using vertex color, step by step. To make things fancier the second layer will animate (scroll).
- Give the shader some descriptive name, providing the whole path, for instance Custom/two_diffuse_layers.
- Press Add Pass to add a new rendering pass.
- Set Diffuse Layers Count to 2.
- Add a new UV modifier by pressing Add UV Modifier button.
- Enable Panning option for UV Modifier 1.
- Right under Diffuse Layers UV Modifier Indices, type 1 in the second text field.
- Press Generate to generate the shader.
- Create a new material, set it the newly created shader. Select two textures for diffuse layers. Modify the parameter UV Modifier 1 – Panning (XY) for the scroll effect. Apply the material to some object.